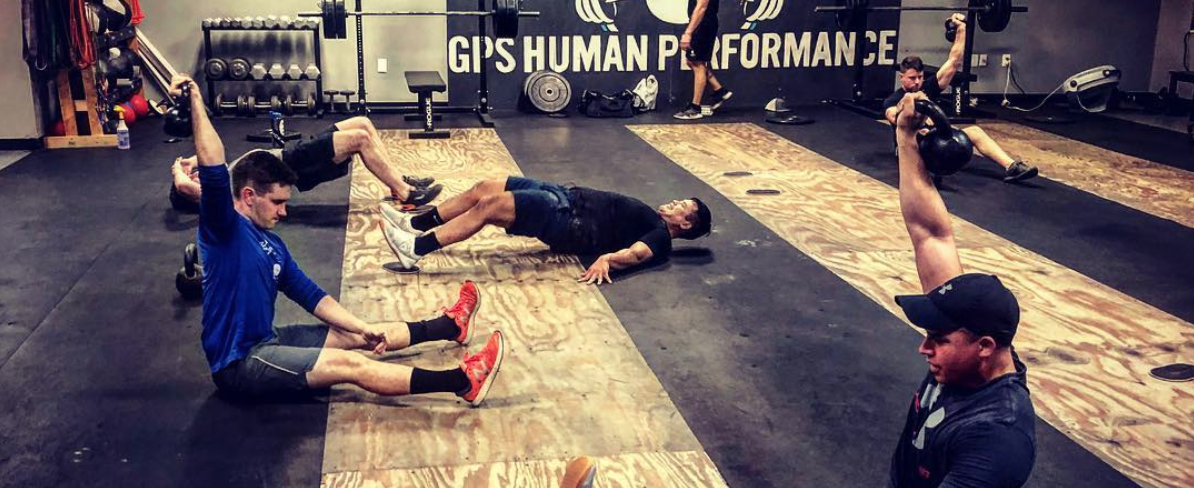
Since October 2018 the Army has been rolling out their new PT test across the country within select units. They have been testing soldiers, as well as training soldiers on how to successfully run and administer the test. I recently got my hands on the final draft of the Army Combat Fitness Test Hand book and I wanted to read through it and pull out the main points to make it more digestible for all of you. We will focus on the testing standards, brief touch on the equipment and what the graders will be looking for. I will also throw in some tips of my own to help you go out and crush it.
For any of you that haven’t read my initial blogs about the ACFT, feel free to check them out here: https://www.gpshumanperformance.com/the-new-army-pt-test/ and https://www.gpshumanperformance.com/how-to-train-for-the-new-army-combat-fitness-test-acft/
The Army Combat Fitness Test is still in its initial stages and there most certainly will be refinements made from the ACFT Field Testing currently in effect but for now we will go forward with the information and guidelines they are using as of April 2019. The “tentative” Army-wide implementation is still set for October 2020, however I have heard through some credible sources that the test in its entirety is still held up in legal and has not been officially/legally approved. So who knows, maybe it gets squashed after they spent millions on medballs and trap bars or maybe it just pushed the official date back some.
“The Army Vision addresses the grit of the American Soldier as a key to success of the United States Army. The ACFT reinforces this through physically challenging and realistic combat movements, requiring perseverance to build tough, combat focused and ready Soldiers.” – Gen. Townsend
The 6 ACFT Events:
- 3-Rep Max Deadlift (MDL)
- Standing Power Throw (SPT)
- Hand Release Push-Up (HRP)
- Sprint Drag Carry (SDC)
- Leg Tuck (LTK)
- 2-Mile Run (2MR)
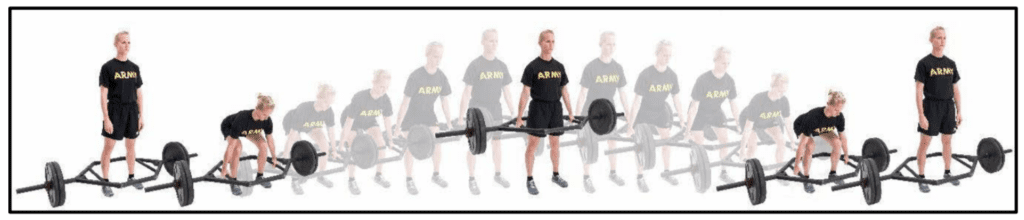
3-REP MAX DEADLIFT (MDL):
The ARMY views this as a test of muscular strength that represents movements required to safely and effectively lift heavy loads from the ground, jump, bound and tolerate landing. They consider it a strong predictor of a Soldier’s ability to lift and carry a casualty on a litter, and to lift and move personnel and equipment. Being strong never killed anyone, if anything it makes them harder to kill. And hopefully this does change the ARMY’s approach to physical training beyond body weight movements.
EQUIPMENT: Per the manual the hex bar must weigh between 58-62 lbs unloaded. Not all trap bars weigh that much and some do weigh more. If you are already training with a trap bar just do a quick check to confirm its weight. ALSO, you will be using the lowest handle setting, so if you are using one with the “D” Handle switch it up and use the lower handles.
START POSITION: Stand inside the trap bar. Feet approximately hip width and toes forward with the weight balanced evenly across them, and centered to the handles. Centered equals somewhere between your ankle bone and the tops of your shoe laces. You’ll be commanded to GET SET. At this point, hinge at your hips and sit your butt down to grab the center of the handles. Your arms will start fully extended and should stay that way throughout. Your back will be flat and the angle should roughly match the same angle that your shinbones have at the start and throughout. Maintain a neutral head to keep your spine in straight alignment, you don’t need to stare to the clouds. All repetitions must begin in this position…
MOVEMENT 1: Your grader will command GO. At that time you will stand up with the bar to an upright position with ankles, knees, hips and shoulders all stacked on top of each other. Hips, shoulders and the bar SHOULD rise up together. Your hips should never rise first or higher than your shoulders, if they do you are lifting shitty! Think about engaging through your arms/upperback first like you are trying to only lift it with your upper body. This will lock in that portion of your body. The back needs to remain flat even when the angle changes as you stand to vertical. Once you are upright you must pause before beginning the descent.
MOVEMENT 2: There will not be a command to LOWER, but remember you must have a “slight” pause at the top per the manual. The easiest/safest way to lower the bar is to reverse the entire movement by unlocking your hips and squatting the bar back down to the ground UNDER CONTROL. You can not slam it back down to the ground. The back must stay flat the entire time, and the weights must return to the ground before the next rep is attempted. Ie floating the weights off the ground. You can “touch ‘n go”, but your weights may not bounce. I recommend practicing deading the bar out every rep in training. It’s harder, but it also makes you way stronger then bouncey deadlifts. Also it’s called a deadlift because it’s dead weight.
NOTES: If you fail to complete three continuous repetitions under control you’ll be permitted one retest at a lower weight. No matter what you only get two record attempts. I suggest making them count. If you are successful on the first attempt, you may elect an additional attempt at a higher weight. But you are not required to take your second record attempt. Graders will stop you if they determine you will injure yourselves by continuing. If you never let yourself perform shitty lifts in training, you’ll never have to worry about this. However, if you are stopped to prevent injury, it is not considered a record attempt.
Common causes of injury include: (per the manual)
- Hips moving above the shoulders.
- Excessive rounding of the shoulders.
- Knees collapsing inwards.
- Dropping the weights.
Graders will terminate a record attempt (which counts as one of two record attempts) if the Soldier: (per the manual)
- Drops or bounces the weights off the ground.
- Rests in the down position. Resting means no continuous effort is being made to lift the weight.
TIP: Focus on making your lifts always look like this during training. If you do that you’ll never need to worry about getting stopped or not credited with lifts. This event requires the most strength so if you are someone who hasn’t lifted weights ever, now would be a good time to start.
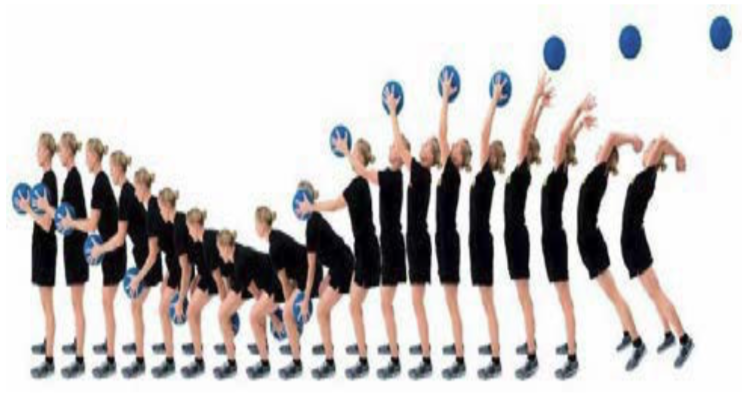
STANDING POWER THROW (SPT):
This test measures upper and lower body explosive power, flexibility, and dynamic balance. Explosive power contributes to tasks requiring quick explosive movements to maneuver equipment and personnel. There is skill associated with this test. If you let the ball go too early or too late it will not travel as far, so practice is highly recommended. Aim for releasing the ball on a 45-degree angle.
EQUIPMENT: The only specifics mentioned about the medball are that it is 10lbs. No dimensions or material types are listed in the manual. From all the videos I’ve watched I can confidently say they are throwing a hard rubber medicine ball, not a slam ball that doesn’t bounce or a larger soft medball. I recommend practicing with the style of ball you will be using for the test, but the other balls will do fine for practicing.
START POSITION: You will start with your back to the start line and both heels at (but not on or over) the start line and holding the medicine ball with both hands at hip level. Feet approximately hip width and toes forward with the weight balanced evenly across them. Grasp the ball firmly and as far around the sides of the ball as possible (per the manual)
NOTE: You are given 1 practice throw to warm-up. This throw is not measured or recorded so there is no need to put max effort into it, but I do recommend throwing it around 90% effort. You are allowed preparatory movements such as flexing at the trunk, knees, and hips while lowering the ball between your legs. Think Russian kettlebell swing or I prefer you to think about a power clean and loading your posterior chain to launch that ball by exploding upward.
EXECUTION: Graders will give the command GO and are tasked at observing your feet. They are looking to ensure you do not step on or over the start line. I recommend bringing the ball up over your head, then dynamically bring it down between your legs as you hinge at your hips, then push with your legs against the ground to begin standing, maintaining approximately the same back angle until the ball is at mid- to upper-thigh. At this point, continue aggressively pushing against the ground and extend the hips violently, as you attempt to launch the ball over head at roughly a 45-degree angle. The ball may land outside of the designated lane, but they do not measure it as the crow flies. The measurement is taken from the center of the landing point perpendicular to the tape measure.
FAULT: The only fault they appear to be looking for is where your feet go. It is imperative to stay behind the line. You do however get faults like in Tennis, and just like in Tennis two faults I a row will count as a record attempt of 0. At minimum you will make 3 throws, one practice and two graded record throws, and at a maximum you will make 5 throws with faults included. All record throws are recorded, however the longer of the two is the official distance recorded.
TIP: I would recommend having your hands a little more scooped under the ball as opposed to on the outside to maximize how much force you put into it. It says towels or rags will be provided but I highly recommend having your own towel just incase the ball is wet. And, if you can, try to stand so your heels are a few inches from the start line. That way if your feet slide back, which they naturally will want to, you won’t cross the line and get dinged with a fault.
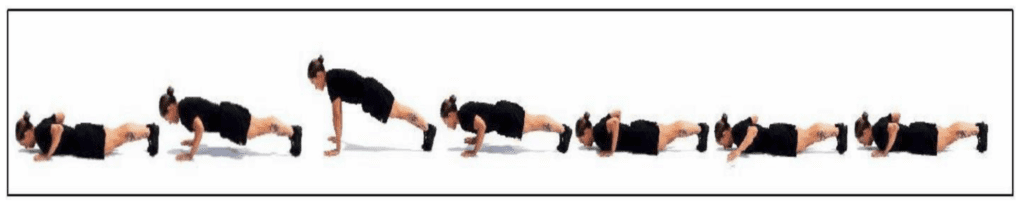
HAND-RELEASE PUSH-UP (HRP):
This test measures upper body muscular endurance, and represents repetitive and sustained pushing used in combat tasks. The HRP tests a Soldier’s ability to push an opponent away during man-to-man contact, push a disabled vehicle, and push up from the ground during evasion and maneuver.
NOTE: Allegedly they are field-testing two variations of the Hand-Release Push-Up, however anyone that I know of that has taken it has only done the Hand Lift protocol.
START POSITION: You will be commanded to GET SET and assume the prone position (laying face down) with hands flat on the ground and index fingers inside the outer edges of the shoulders. The chest and front of the hips and thighs will be on the ground. Toes will touch the ground with feet together or up to a boot’s width apart.
MOVEMENT 1: Pushing Up… When you are commanded GO, you will push you push yourself up as a single unit to the up position by fully extending the elbows (aka front leaning rest). You must maintain a generally straight body alignment from the head through the shoulders, hips, knees and ankles for the duration of the HRP. Failing to maintain a generally straight alignment during a repetition will cause that repetition to not count FYI. You are only allowed to rest in the up Front Leaning Rest position. Whatever you do don’t bend or flex the knees, hips, trunk, or neck because per the manual that is not authorized.
MOVEMENT 2: Lowering Down… Once you’ve reached full elbow extension you will bend your elbows to lower your body back to the ground. The chest, hips and thighs should touch down at the same time.
MOVEMENT 3b: Hand Lift HRP… While on the ground you lift both hands from the ground at the same time to show a clear gap between the palms and the ground. The hands are then lowered back to the ground, ensuring that your index fingers are under the shoulders.
MOVEMENT 3a: Arm Extension HRP… While on the ground you will extend both hands out from the body until the arms are fully extended forming a T-Shape between the arms and trunk at the shoulders. Hands may be on or off the ground. I recommend touching them to the ground to ensure you are counted for fully extending the arms. Just like the Hand Lift protocol you will bring your hands back in ensuring that your index fingers are under the shoulders.
NOTE: Biggest thing to remember is to ensure your index fingers are inside the outer edges of the shoulders each rep.
TIPS: You must make a continuous effort to push up and cannot rest on the ground. Per the manual, “if your effort stops for longer than 5 seconds that is considered resting.” Keep your feet down the whole time and do not let a knee touch down. Focus on the whole body moving as one and fight your body sagging. Keep your glutes engaged the whole time.
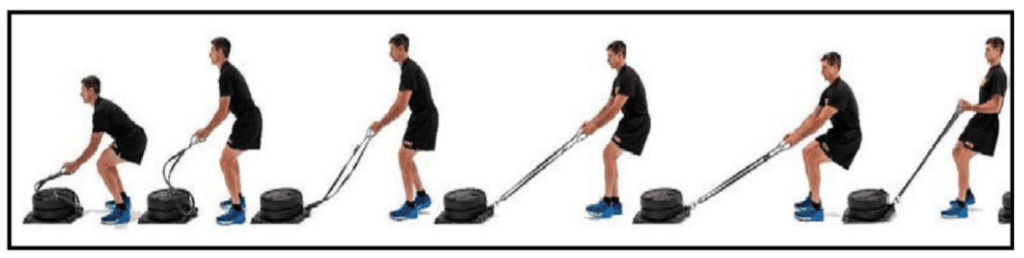
SPRINT-DRAG-CARRY (SDC):
This test is a measure of muscular power, endurance, and strength, and anaerobic capacity, which are needed to accomplish high intensity combat tasks that last from a few seconds to several minutes. However…this should not take anyone several minutes to do!
EQUIPMENT: Lots of it! 2 x 40lb Kettlebells, 2 x 45lb Weight Plates, 1 x Nylon Sled with Pull Straps and some cones to help mark lanes.
START POSITION: You will be commanded to GET SET, assume the prone position (laying down on stomach) with the top of the head behind the start line.
SPRINT: On the command GO sprint 25m and touch the line with both your hand and foot then turn sprint back to the start line. You will be called back if you miss the line, which will cost valuable time so don’t miss.
DRAG: When you get back to the start line you will then grab each strap handle of the 90lb sled and pull the sled backwards until the entire sled crosses the 25m line then turn the sled around and pull back until the entire sled crosses the start line. Again, get the entire sled over the line so you aren’t called back. Also remember, you are supposed to be back pedaling the entire time, you can’t turn sideways and run with the sled.
*LATERAL SHUFFLE: Once the sled is back to the start line you will laterally shuffle 25m, touch the 25m turn line with your foot and hand, and perform the lateral shuffle back to the start line facing the same direction. Same thing, don’t miss the line!!!
*NOTE: I have had two of my soldiers that I train head off to the ACFT training, 2 months apart, and they both said that the soldiers are required to keep their hands in front of them during the lateral shuffle. When they demonstrated it to me it looked like a mime trapped in an invisible box. I can’t find anything in the manual about that except the picture, so I can neither confirm nor deny that being official.
CARRY: Once you are back to the start line you will pick up the two 40lb kettlebells and run to the 25m turn line. Step on or over the 25m turn line with one foot and turn and run back to the start line. If you end up dropping a KB, just pick it up and keep going.
SPRINT: Once you step back over the start line, set the KB’s down under control, turn and sprint back to the 25m line , touch with both your foot and hand and turn and sprint back to the start line. Again, don’t miss the line whatever you do.
Graders will correct Soldier performance that may result in injury to include:
- Jerking the straps or slinging the sled to turn the sled around.
- Crossing the feet during the lateral shuffle.
- Failure to turn under control after picking up kettlebells.
- Throwing the kettlebells.
Graders will call Soldiers back to the start line or the 25m turn line to correct violations in performance to include:
- Failure to touch the line with a hand and foot while sprinting or doing laterals.
- Failure to pull the entire sled across the 25m or start line; your body must cross the line pulling the sled backwards until the entire sled crosses the line; Soldier may then turn the sled.
- Failure to pull the entire sled across the start line before beginning the laterals.
- Failure to place the kettlebells on the ground under control; You may not throw or toss the kettlebells.
TIPS: TOUCH EVERY LINE! There is no bigger waste of time during this test than missing a line and having to go back. If you are nervous about your grip use the hook grip on the kettlebells. There is no rules saying other wise so until they say you can’t I’d recommend it if you are worried about your grip. Even if you aren’t it makes your grip significantly stronger. Also, bring a towel.
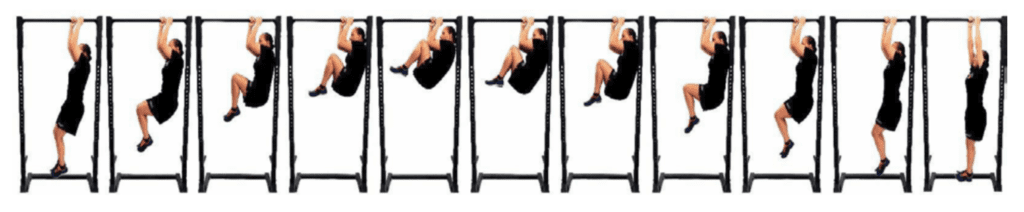
LEG TUCK (LTK):
This movement has “occupational” relevance and tests a Soldier’s muscular strength and endurance. LTK will assess grip strength, shoulder adduction and flexion, elbow flexion, and trunk and hip flexion.
EQUIPMENT: Pull-up bar.
START POSITION: You will be commanded to GET SET. You will mount the bar and assume a straight-arm hang on the bar. Your grip is the alternating grip, it’s recommended placing the dominant hand closest to the head. The body is perpendicular with the bar, however the alternating grip will cause the body to rotate outward slightly. Your body must be fully extended in a straight-arm position (elbows, trunk, and hips are straight). Legs and feet may not be crossed; feet must be off the ground with knees bent if necessary if you are a giant.
MOVEMENT 1: You will be commanded GO and you will flex at the elbows, knees, hips, and waist to lift the knees. Flexing at the elbows does assist with this movement so if you can’t do a pull-up or a chin-up READ THIS. Both knees/thighs must touch the right and left elbows, respectively at the same time. **However one of my soldiers that went to the training said that you can bring one knee up then the other**
MOVEMENT 2: You will return under control to the straight-arm position, elbows straight, to complete each repetition. If the elbows remain bent, the next repetition will not count. You do not have to be completely still per the manual. Small, inconsequential, or passive movement of the body and twisting of the trunk is permitted. However, deliberately swinging the trunk and legs to assist with lifting the knees is not permitted and will cause the subsequent repetition to not count. So try to be as strict as possible.
NOTES: You may rest in the straight-arm (down) position and may adjust grip positions by moving the hands. Your feet cannot touch the ground during grip adjustments. And you cannot drop from the bar before assuming the straight-arm hang position UNDERCONTROL in order for the last repetition to count. The LTK event will be terminated if you drop from the bar.The grader may steady the Soldier to prevent or control excessive swinging.
Graders and Soldiers will apply the following safety tips:
- Ensure the bar is free of moisture before mounting the bar.
- Use a foot mount or grader-assist to mount the bar.
- Ensure that your hands are near the mid-point of the bar.
- Prevent the head or back from striking the horizontal or vertical posts.
A repetition will not count if you:
- Fail to touch both knees (or thighs) to both elbows.
- Swing or twist to establish momentum to lift the knees.
- Fail to return to a straight-arm position; arms fully extended in the down position.
- Pushes off the post, ground or bar with back or foot to establish momentum to lift the knees.
- Incidental contact with the ground, post or bar is not penalized if the grader deems you have gained no advantage.
TIPS: DO MORE PULL-UPS!!! And be as strict as possible with them as well. You don’t have to do a full pull-up for this test but you are required to unlock your elbows each rep. The stronger you are the easier that will be. **Per my soldier, both knees/thighs don’t have to make contact at the same time, but they both have to be in contact at the same time to count. So if you can get one knee up first then pull the other up. And as long as they both are in contact at the same time it counts.** And as always bring a towel.
2 Mile Run (2MR):
This is a test of aerobic endurance. I recommend running fast!